

How To Read A Ultrasound Picture
What is ultrasound?
Ultrasound is a common imaging modality that allows visualisation in real-time. As such it is becoming increasingly popular on the wards for diagnosis and management purposes. Yous should be familiar with its operation and know in which situations it may assistance your clinical decision making.
What is ultrasound used for?
Ultrasound can exist used for:
- Assessment of jugular venous pressure (JVP)
- Venepuncture
- Focused assessment for screening in trauma (FAST)
- Lumbar puncture
- Thoracentesis
- Paracentesis
- Evaluation of abdominal organs
- Biopsy
- Pregnancy
You lot might as well be interested in our OSCE Flashcard Collection which contains over 2000 flashcards that cover clinical test, procedures, communication skills and data estimation.
Ultrasound basics
How does ultrasound piece of work?¹
1. High-frequency sound waves are transmitted from a transducer.
two. These sound waves are then reflected past different tissue types in different ways.
3. The reflected audio waves are so picked upward by the ultrasound transducer.
4. The sound waves are and then transformed into an paradigm by special software.
How exercise tissue types differ in their reflection of sound waves?
Bones, fat and stones
Bones, fat and stones produce a hyperechoic indicate.
A hyperechoic indicate is brilliant as most ultrasound waves are reflected.
Cartilage and muscle
Cartilage and muscle produce a hypoechoic indicate.
A hypoechoic signal appearsdark equally well-nigh waves laissez passer through the tissue.
Fluid and fluid-filled structures
Fluid and fluid-filled structures produce an anechoic signal.
An anechoic signal appears black equally there is no reflection of ultrasound waves.
Other
A shadow may be noted on an ultrasound when a hypoechoic expanse is located backside a hyperechoic structure.
Getting started
The beginning steps of performing an ultrasound involve:
- Turning on the car (piece of cake, simply often overlooked; often a button in the upper left or right corner of the keypad).
- Entering the patient's information (e.g. proper name, date of birth, infirmary number).
- Selecting an appropriate ultrasound probe for the area being examined.
Probe basics
How do I know which probe I should use?
Typically in that location are iii different types of ultrasound probe: linear, curvilinear and phased.
Linear probe:
- High frequency (7-15MHz):
- Loftier resolution but superficial (i-6cm) depth
- Good for vascular access, nerve blocks, cess of testes and superficial lung tissue
Curvilinear:
- Low frequency (ii-5MHz)
- Low resolution, but greater depth (10-20cm)
- Useful for abdominal, pelvic, obstetric and deep lung tissue
Phased:
- The lowest frequency (1-3MHz)
- Useful for echocardiography
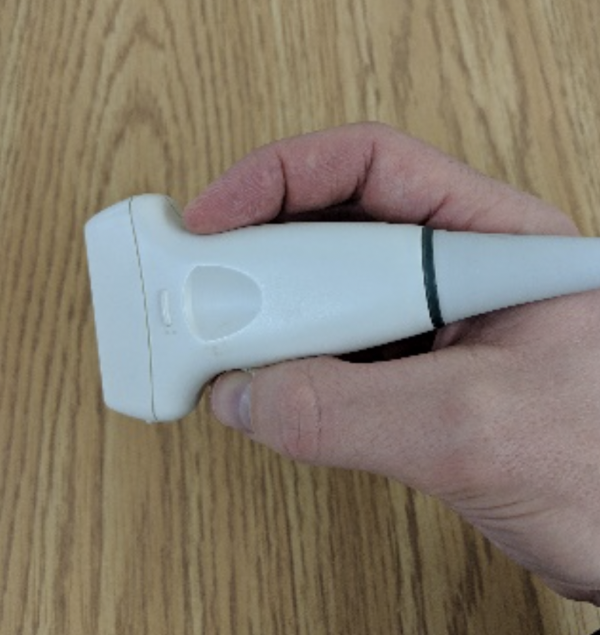
How do I hold the probe?
The image beneath demonstrates how to appropriately concord an ultrasound probe.
Probe orientation
Typically, there is a dot or a cantankerous on the probe, this correlates with a dot on the left side of the screen.
This marker should exist toward the patient'south right in transverse and head in longitudinal.
If you are unsure, information technology is best to place your finger on one side of the probe and look for move on the screen (the side that shows movement by the dot is the side that should confront the patient's correct).
Next steps
Once y'all've chosen an advisable probe and are holding it right, the next steps of performing an ultrasound involve:
- Applying gel to the probe and patient.
- Placing the probe onto the patient and observing the images on the screen.
- Adjusting the settings to achieve an optimal view.
Mutual settings for achieving an optimal view
Gain:
- Adjusting the gain of an ultrasound changes the brightness of the paradigm.
- Gain is typically controlled by a knob.
- The gain should be adjusted until fluid appears black and soft tissue appears mid-gray with some parts of the image appearing white
Depth:
- Depth measures are shown in cm on the side of the ultrasound monitor.
- It is often all-time to begin deep to orientate yourself and then work more than superficially to bring the object of interest into the middle of the screen.
General tips for achieving an optimal view
Some general tips for achieving an optimal view include:
- Use lots of gel
- Make practiced contact between the probe and skin (whilst ensuring the patient is comfortable)
- Dim the lights to amend your view of the monitor
- Ensure the probe is perpendicular to the skin
Measuring the JVP with ultrasound
1. Position your patient equally you would when assessing the jugular venous pressure (JVP) in a clinical exam (e.thousand. supine, head of the bed at 45°, patient's head laterally rotated to the side not beingness scanned)
2. Set the gain of the ultrasound to mid-range.
3. Utilize gel to the patient's neck.
four. Place the probe in a transverse orientation within 2cm of the clavicle.
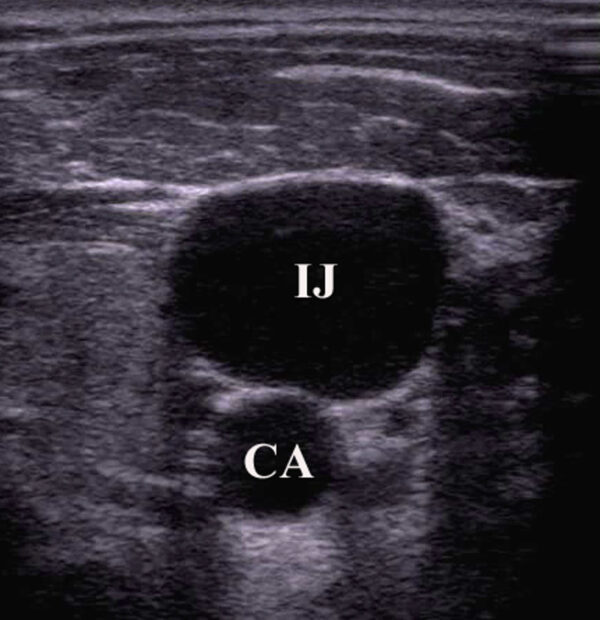
5. Identify the internal jugular vein (IJV) and the carotid artery, assessing the post-obit:
- Wall thickness: arteries take thicker more muscular walls than venous structures.
- Shape: the carotid volition be circular whereas the IJV tin can exist oval or irregularly shaped.
- Compressibility: veins are easily compressed (if you lot but see ane vessel, use less pressure as you may have fully compressed the IJV).
- Respiratory variability: central venous structures will fluctuate in size with respiration.
- Position: the IJV is unremarkably (but not always) lateral to the carotid.
six. Eye the probe so the IJV is centred on the monitor.
7. Slowly rotate the probe keeping the IJV in the heart until a sagittal view is accomplished (ensure you are non foreshortening the vein by advisedly moving the probe medially and laterally).
8. Locate the bespeak of the initial collapse of the IJV (centre the probe over this signal).
nine. Mensurate the JVP elevation above the sternal angle every bit normal.
Ultrasound-guided intravenous access
In this department, we will exist focusing on peripheral intravenous access, withal, like principles are practical for central venous line insertions.5,6
Indications
Indications for ultrasound-guided intravenous admission include:
- Multiple failed attempts
- History of difficult cannulation
Contraindications
Ultrasound-guided IV access should non supplant intraosseous (IO) access in life-threatening situations.
Probe choice
A high frequency (5-12 MHz) linear transducer is typically used as high frequency permits a improve resolution of structures shut to the surface of the skin
A lower frequency curved probe may be more than effective in obese patients.
Steps
one. Select a vein (equally per non-ultrasound guided peripheral IV placement).
2. Machine gear up up:
- Turn on
- Choose advisable test pre-fix: typically "peripheral vascular venous" or "superficial vascular, venous"
3. Clean the ultrasound probe.
four. Apply a tourniquet.
5. Apply gel to the ultrasound probe.
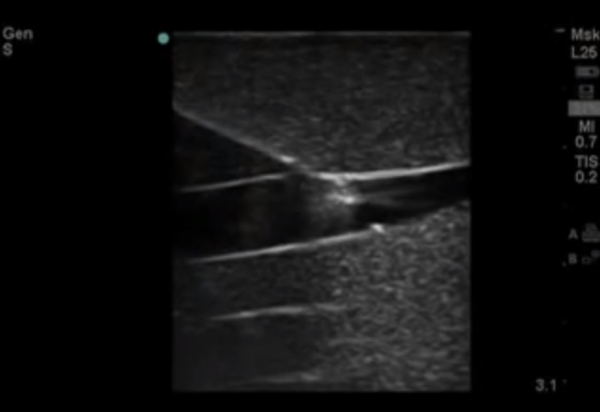
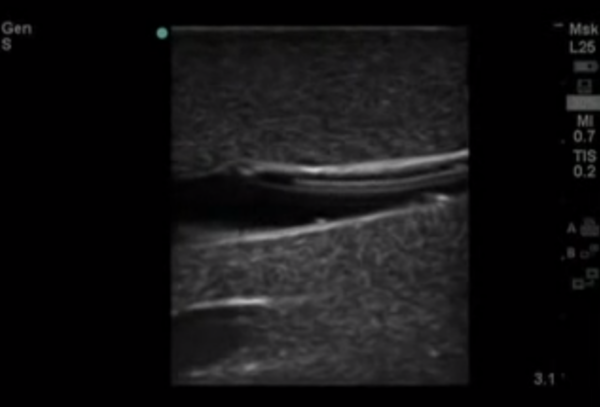
6. Identify the target vein in the transverse plane: notation the depth of the anterior wall of the vein and pay attention to any adjacent structures.
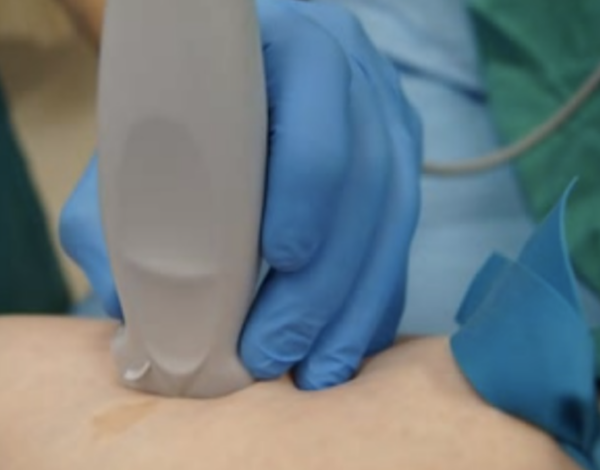
vii. Once identified, rotate the probe into the longitudinal plane. Hold the probe with the thumb, index, and middle fingers as shown, using the remaining fingers as an anchor.
eight. Make clean the patient's skin.
9. Marshal the needle prior to insertion.
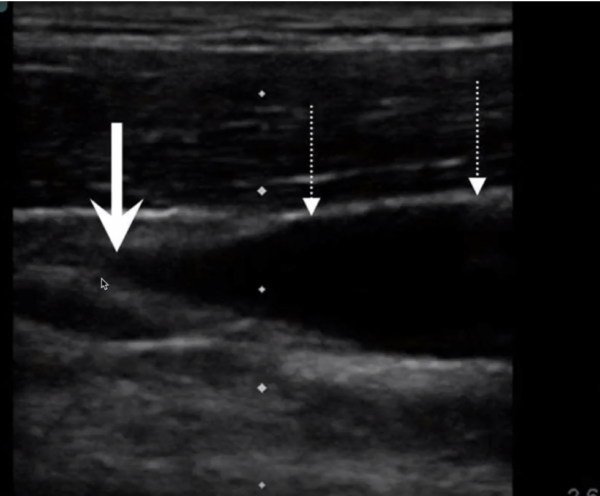
ten. Insert the needle just distal to the transducer probe:
- Y'all should be able to see the needle throughout the procedure on the screen, if you cannot, you must realign.
- You lot tin can gently stone the probe to help run across the wink of the needle tip if needed.
- Do not advance the needle unless you are able to clearly come across the tip.
11. Accelerate the needle into the vein.
12. Concord the needle still and lookout man as you advance the catheter into the vein.
Common pitfalls
Common pitfalls for ultrasound-guided intravenous access include:
- Applying too much pressure level and thus collapsing the vein.
- Choosing suboptimal settings on the ultrasound automobile.
Focused assessment with sonography for trauma (FAST)
FAST is used in emergency settings to rule out free fluid in the belly as well as pericardial effusions using a curvilinear probe.
As discussed previously, fluid shows upwardly equally blackness, so the scanning clinician is inspecting for blackness lines surrounding organs.
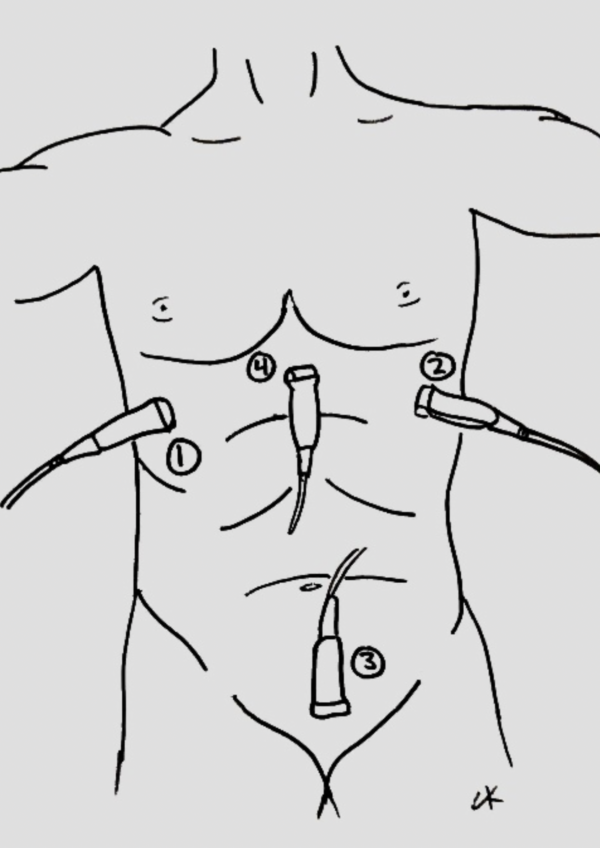
Probe locations
The key probe locations for FAST are:
- Right upper quadrant
- Left upper quadrant
- Suprapubic region
- Sub-xiphoid region
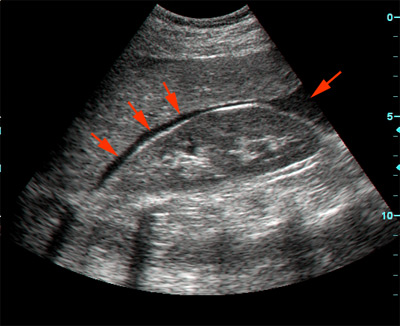
Right upper quadrant view (Morison'due south pouch)
The ultrasound probe is positioned in the coronal airplane in correct mid-axillary line (between rib xi and 12).
Once positioned correctly, the ultrasonographer inspects for evidence of complimentary fluid between the liver and the kidney.
Ribs are oft in the way; and then the probe ofttimes requires some tilting/rotating to marshal it with an intercostal space.
Left upper quadrant view (perisplenic view)
Similar to Morison's pouch, merely the transducer is placed approximately half a probe length more superior and posterior (as the left kidney is more superior and posterior than the right).
The ultrasonographer inspects for free fluid between the kidney and spleen.
Cardiac view
The ultrasound probe is positioned in the transverse airplane, within the sub-xiphoid region (with the probe aimed at the heart).
The ultrasonographer inspects for bear witness of pericardial effusion.
Pelvic view (suprapubic)
The ultrasound probe is positioned in the suprapubic region, pointing towards the bladder.
The ultrasonographer inspects for free fluid exterior of the bladder.
Both transverse and longitudinal images are typically assessed.
References
- Toronto Notes 2016: Medical Students Essential Med Notes.
- Clay Kurtz (Writer'south own work)
- Emergency Ultrasonography. Resources and Tutorials on EM Ultrasound. Available from: [LINK].
- Canadian Internal Medicine Ultrasound (CIMUS). Available from: [LINK]
- Joing Southward, Strote S, Caroon L, et al. Ultrasound-guided peripheral Four placement.N Engl J Med. 2012;366(25):e38.
- UpToDate. Principles of ultrasound-guided venous access. Jeremiah J Sabado, Doctor and Mauro Pittiruti, MD. Available from: [LINK].
- Ltyore. Morison's pouch. Public Domain.
- The POCUS Atlas. Available from: [LINK].

Source: https://geekymedics.com/a-beginners-guide-to-ultrasound/
0 Response to "How To Read A Ultrasound Picture"
Post a Comment